Stacks
Combining several shots of the same subject in Photoshop has several benefits. Two techniques are discussed in this article: Focus Stacking and Image Stacking. Focus Stacking is a technique that will increase the depth of field so that subjects both near and far will be sharp. Image Stacking reduces digital noise, moiré, and improves resolution. Photoshop actions may be downloaded that support each method.
Camera Settings
The same exposure and white balance are required. Set your camera to Manual mode to keep exposure the same. If you are shooting JPEGs then select a specific white balance (not Auto). If you are shooting Raw it's easy to correct for white balance during post-processing.
Preparing Images
In Bridge select all images, right-click, and Open in Camera Raw. In Adobe Camera Raw make adjustments, such as Exposure and Contrast, as needed. For Raw files also change the Temperature and Tint, then change it back again. This will force all images to have the same white balance. Then select all images and Sync Settings. Now choose Done to save your updates. To load images from Bridge into Photoshop choose Tools > Photoshop > Load Files into Photoshop Layers.
In Lightroom select the images, adjust one, then choose Sync to apply your changes to the remaining images. Then choose Photo > Edit In > Open as Layers in Photoshop.
Focus Stacking
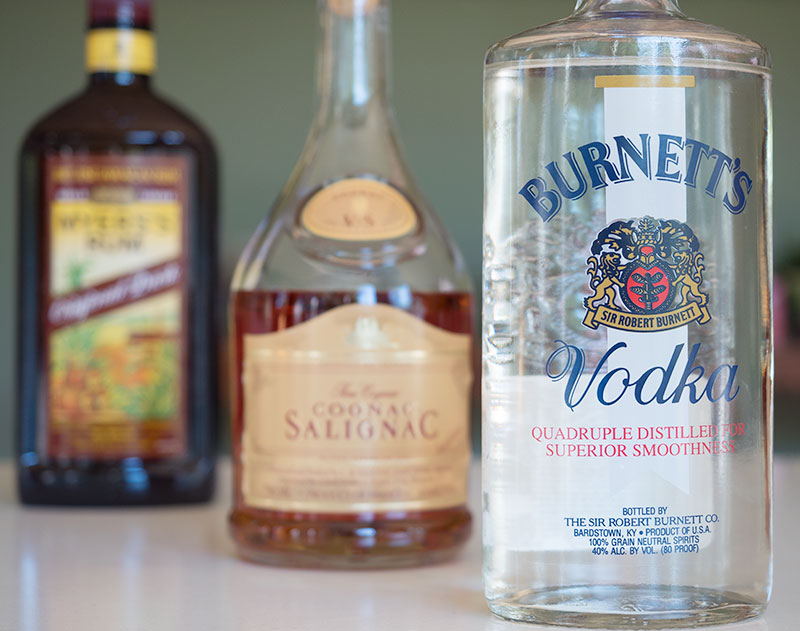
Focus stacking combines several images, each taken with a different focus, into a single sharp image. In the following example three shots were taken with the focus changing for each bottle. The images were then imported into Photoshop, as separate layers in a single document, and blended to produce a cocktail containing the sharpest bits of each image.
Photoshop does this by creating a mask for each layer as shown below. White shows, black hides.

Change the focus as you take each image. Since images are aligned in the first step of the action it is possible to handhold the camera. However, using a tripod is often more convenient. The Focus Stacking action proceeds as follows:
- align layers
- Auto-Blend layers
- flatten image
If adjustments to the masks need to be made visit the History panel, back up one step so the layers are no longer flattened, and click on each mask to paint. Try erasing the offending areas with black first, then painting with white from an appropriate image.
Update
Since writing this section a firmware update to my camera implemented focus stacking. The ability to specify the number of shots, and the change in focus between each shot, makes it possible to press the shutter release once watch the camera do all the work.
In addition, software has been written that is tailored for focus stacking. Zerene Stacker has an intuitive and well-designed interface. Click on Tutorials at their site and watch the two videos for a quick introduction. Focus stacking proved especially effective for these flower shots.
Image Stacking
Image Stacking reduces noise, moiré, and adds detail. This is especially the case for high ISO images. The action included in the download is compatible with Photoshop CC or older versions of Photoshop that support Smart Objects and mean/median filters. If your version of Photoshop does not have these features see the alternative, below.
As long as the shutter speed is fast enough to avoid image blur, no tripod is necessary. I've found that 10 images works well. I configure the camera for sequential shooting at 10 frames per second. With this setting it will use the same exposure and white balance for all images so pressing the shutter release for one second does the job. The Image Stacking action proceeds as follow:
- align layers
- convert to Smart Object
- Mean/Median filter
- flatten and sharpen
You can enable either a Mean or Median filter in the action to combine images. They both work about the same for stationary subjects. When something is in motion, such as small movements of grass or leaves, the Median filter works best as it gives more weight to features that occur in the majority of frames. This has the effect of freezing those features and results in a sharper image. Note that it takes the Median filter longer to execute. Since noise in each image is random the real image will show through the noise when they are averaged.
Best results are obtained if you shoot Raw and do capture sharpening before processing. When sharpening avoid using noise reduction as this will suppress details that could otherwise be retrieved.
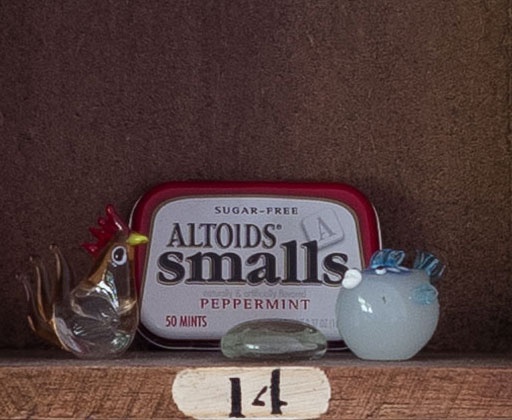
Ten shots of the following target were taken at ISO 25600 and processed with the Image Stacking action. For a larger view click here.
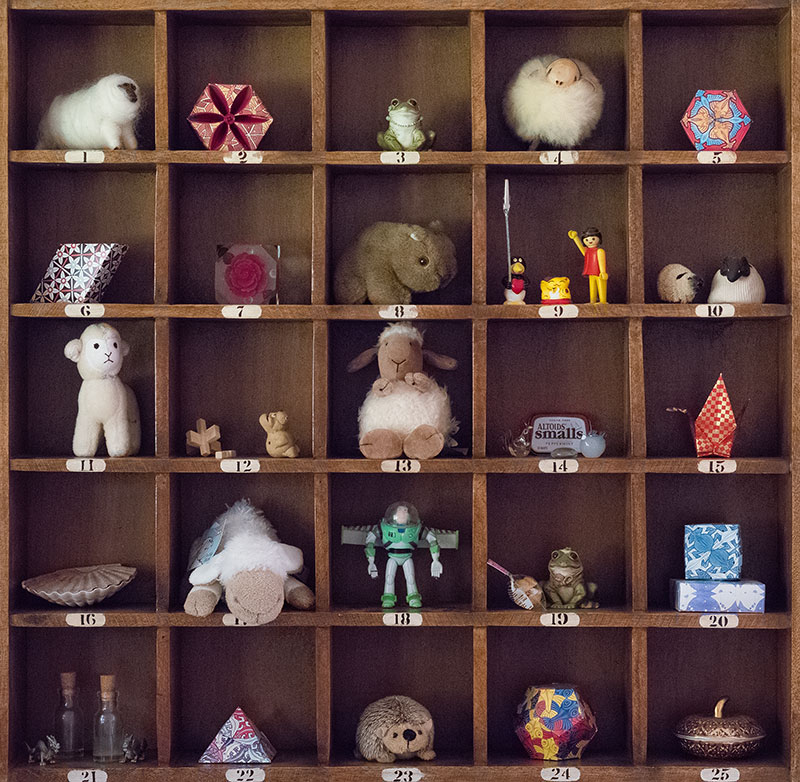
For purposes of comparison a 100% crop is illustrated below. Click on the radio buttons, below, to view each image. Note the writing on the Altoids box. Illegible at ISO 25600, it can be clearly read when stacked.
Alternative for older versions of Photoshop
If you have an older version of Photoshop that does not support Smart Objects or the Mean/Median filters proceed as follows:
- Select all layers and choose Edit > Auto-Align Layers. Specify Auto projection and do not correct for Vignetting or Geometric Distortion.
- Alter the Opacity of each layer as follows: 1, 1/2, 1/3, 1/4, and so forth. In other words the bottom layer should have an opacity of 100%, the next layer 50%, the next layer 33%, and the next layer 25%.
You have now averaged your images. At this point you can flatten the layers and sharpen the results.