Sheet Film Frame

Description
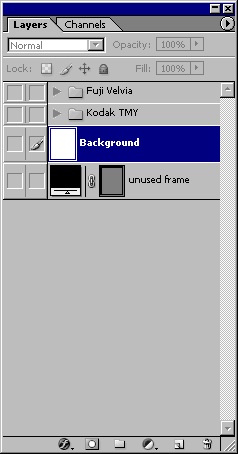
A frame is supplied for 4x5 images. Download and installation instructions are in the film frames download. The frame consists of the following layers.
Construction
Both Film1 and Film2 layers have notch codes. Film1 also has a cutout for the image, while Film2 does not. Consequently, the drop shadow that is applied to Film2 only affects the outer edge and sprocket holes. As an aid to insertion, a ruby red layer is placed just below the insertion point of the image. After moving the image into the frame, make minor adjustments to remove all traces of the red backdrop.
Use the "unused frame" at the end of the Layers palette to construct your own sheet film template. PDF files are included in the download that illustrate notch codes for Kodak and Fuji films. The Pen tool is a good choice for cutting notches in the frame. Choose the frame layer, click the Pen tool, then click on the frame layer vector mask until the Pen tool options are enabled in the options bar. Press the Exclude Overlapping Shape Areas button and start drawing. For precise positioning do the following:
- Disable all images except the unused frame.
- Choose Image > Trim, Transparent Pixels, to fill the document with the frame.
- Choose Image > Canvas Size and add an extra 200 relative pixels to height and width.
- Specify grid spacing in Edit > Preferences > Guides, Grids & Slices. Place a grid line every 100 pixels with 8 subdivisions. Color grid lines yellow for visibility.
- Enable View > Snap To > Grid.
- Enable View > Snap.
- Enable View > Show > Grid (Ctrl-').
With these settings points placed on the frame will precisely align with frame features.